(Version 26 Oct 2021)
A/ General recommendations
1) First step: look at examples online and try it out.
An example of a session with 4 pre-recorded presentations (from an IUSSP/PopPov conference held last year) is available here.
(For those interested, the full conference can be viewed here).
Now that you’ve seen what it can look like, try it out. We suggest using Zoom to record your presentation (see section B) but you can also use PowerPoint or other software to record yourself. Try out one or more solutions and figure out what works best for you.
2) Prepare your presentation
We recommend you include a video of yourself presenting your slides. If you have tried out a recording software, check where you appear on the recording. Typically, using zoom, your video will be recorded as a small rectangle in the top-right corner of your slides. Consider leaving that small space empty on your slides (e.g., so that your face does not cover the titles of you slides). In preparing your presentation, keep in mind its required duration – 12 minutes for a regular session, 7 minutes for a flash session. If your video file is too long, you will be required to redo it.
3) Choose the right setting and set-up
Make sure the room is quiet, the lighting is on your face (not in back of you), the background appropriate. Look in the general direction of the camera and place yourself sufficiently close to the camera because when the recorded video appears in a small rectangle in the corner of your slides, you still want your audience to be able to read your expression.
Whether you are using an external microphone or a built-in microphone for a camera or earphones, check the volume and quality of the sound recording before you begin. Avoid speaking too close to the microphone because this can cause popping and sibilance that reduces clarity of the recorded speech. If you are using a microphone built into your earphone set that hangs below your mouth, make sure it isn’t so close that you get popping sounds when pronouncing “p” and “b” or a hissing sound with “f” and “s”. Also make sure the microphone is not rubbing on your clothes creating background noises.
4) Present in “Slide Show” mode
Your slides should fill the screen (e.g., using ‘Slide Show’ mode in PowerPoint). If you use more than one monitor, make sure that your slides display in ‘Slide Show’ mode on your main monitor for the recording.
5) Check and practice videorecording your presentation
Schedule some time to practice before making the final recording. At the beginning, try making a 1-minute video recording so that you know what you sound (and look) like. This will help you to get the right audio levels and to check the pace of your presentation. You can pause and restart the recording, but we recommend you record the presentation in one go.
6) Ask for help and/or present in front of an audience
If you are not familiar with how to make a video recording or are worried about giving the presentation while handling the technical aspects, consider asking someone to help you.
Some of you may find it easier to present in front of an audience, in-person or virtual. If you choose to present with a virtual audience (e.g. others invited to the zoom meeting you are recording), make sure that you are recording in “speaker… “ not “gallery view.
7) Handle mistakes professionally
You don’t have to make a perfect recording free from all errors. If you make a mistake in your speech or in moving between your slides, simply apologize and move on with your presentation. Even highly experienced presenters make minor mistakes as they present—it’s a natural part of communicating, so don’t worry about it.
8) Communicate naturally
Try to maintain good posture when speaking, without leaning into the microphone. If you plan to appear while presenting in your recording, view your slides (and/or your script) on a screen directly in front of you and place your camera on top of or in front of that screen. This helps you look in the general direction of the camera, in the same way that you would look at the audience during an in-person presentation. Try to smile at the beginning and end of the presentation to engage with the audience. Also, remember to dress appropriately for the virtual event, as if you were attending in person.
B/ Example: Record your presentation in zoom with PowerPoint slides
Note: Before doing any recording, make sure to prepare your slidedeck to make room for the video image of yourself, so that your video image won't be overlaid on top of any text or images. Sometimes drawing a rectangular box on each slide helps to "save" a space for your video to go.
1) Open the Zoom app and your PowerPoint file. Close all other files and applications.
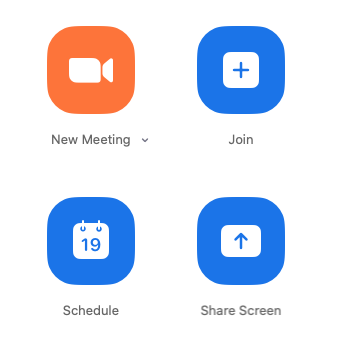
2) In Zoom, click “New Meeting” (orange icon); make sure your microphone and camera are on.
3) Click the “Share Screen” button on the bottom toolbar and select your open PowerPoint file from the options.
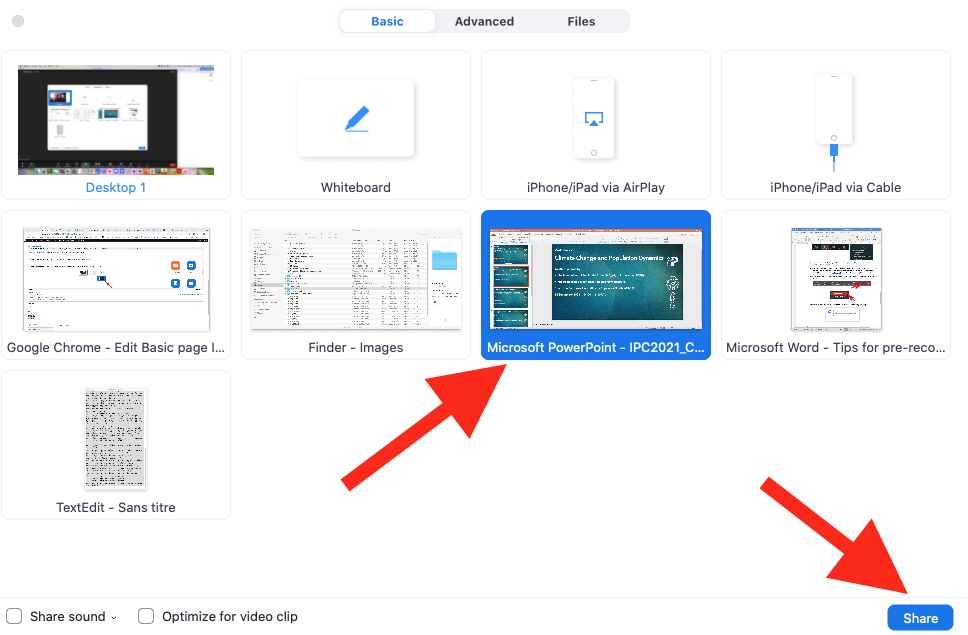
4) Click “Share”.
5) Go to PowerPoint and launch your slideshow.
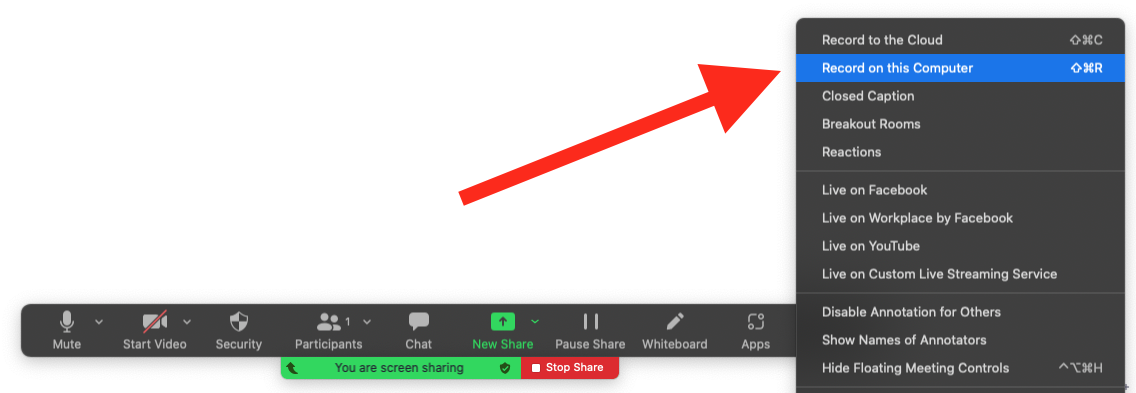
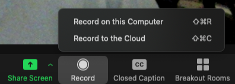 6) When you are ready to record go to the bottom Zoom toolbar and choose Record, then choose “Record on this Computer” from the menu that pops up (see on the right). You may also choose to use keyboard shortcuts: Alt+R on PC, Shift+Alt+R on a Mac. Your lecture is now recording.
Note: if you don't see the Record button, you may need to click on the "More" button in the Zoom toolbar, and then choose the "Record on this Computer" option (see below)

7) Start your lecture. Advance your slides with the right arrow key; return to a previous slide with the left arrow key.
8) When your presentation is finished, click on the "Stop Recording" button in the bottom Zoom toolbar or use the same keyboard shortcuts as to start a recording: Alt+R on PC, Shift+Alt+R on a Mac. Note: if you don't see the Stop Recording button, you may need to click on the "More" button in the Zoom toolbar, and choose the "Stop Recording" option there.
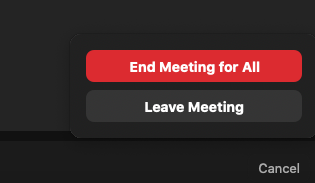
9) Click “End Meeting” on the bottom right of the meeting screen.
![]()
Then click “End Meeting for All.”
10) A box will pop up telling you that Zoom is converting your meeting recording.
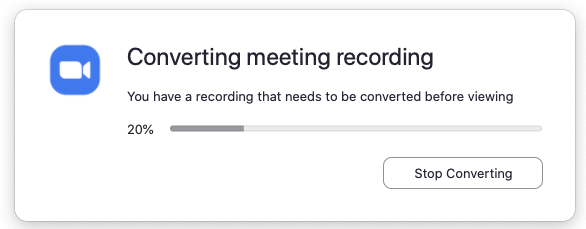
When the conversion is complete, the recording will be saved on your hard drive. Save the mp4 file under an appropriate name and in an appropriate location.
*At anytime, if you need the zoom buttons but they’ve disappeared, roll your mouse over the green “You are screen sharing” bar and they will reappear.
*If needed you can trim the beginning and ending of your video using QuickTime or another video editing tool (though it is easier to start and stop recording at the right moment).
There are plenty of videos on youtube that show you how to record a presentation in zoom. They are often made by geeks… or by University professors using their university’s zoom account but you can use a free zoom account and follow their instructions from when they open a zoom meeting. Here are a few videos you may find this helpful (many others can be found online):
- https://www.youtube.com/watch?v=Wp16MNHnBTc
- https://www.youtube.com/watch?v=KhjZZSSHfOg
- https://www.youtube.com/watch?v=Jnzfhft1xGQ
Note: Information on how to send your video to IPC2021 will be provided in due time.